

Last Updated: October 2, 2026
Quick Answer: How to Maintain Outdoor Sauna Wood
Clean interior wood with a soft brush or damp cloth and a sauna-safe cleaner. Keep the sauna ventilated and dry after each session. Treat interior benches with sauna-safe paraffin oil or wax when water stops beading, and protect exterior wood with a breathable, UV-resistant finish designed for outdoor use. Avoid soaking the wood, using high-pressure washing, or applying indoor sauna products to exterior surfaces.
Table of Contents
- Why Outdoor Sauna Wood Needs a Different Maintenance Routine
- What You'll Need: Tools and Sauna-Safe Products
- Step 1: Clean Interior and Exterior Surfaces Safely
- Step 2: Pressure Washing vs. Manual Cleaning on Outdoor Sauna Wood
- Step 3: How Often to Oil Sauna Benches and Interior Wood
- Step 4: Seal and Protect Exterior Wood Surfaces
- Step 5: Preventing Mold in Outdoor Saunas
- Seasonal Maintenance Checklist and Wood Species Care
- Common Mistakes That Damage Outdoor Sauna Wood
- Frequently Asked Questions
Why Outdoor Sauna Wood Needs a Different Maintenance Routine
Outdoor sauna wood is any natural softwood or hardwood surface on an exterior sauna that must survive sun, rain, snow, and constant heat cycling without cracking, graying, or growing mold. Indoor wood only deals with heat and humidity; wood outside deals with all of that plus weather, which changes everything about care.

This guide from My Luxury Home Spa covers the full routine, from weekly wipe-downs to annual sealing: which products are safe and how to build a schedule you'll follow.
Sun, Rain, and Temperature Swings: What Outdoor Wood Faces
Ultraviolet light is the most underrated threat to an exterior sauna. It breaks down lignin, the natural glue inside wood cells, turning untreated boards silver-gray with fine surface cracks. Water then soaks in, freezes, expands, and widens them further.
Thermal expansion adds stress: a cedar bench can swing from ambient temperature to over 150°F during a session, then cool again, hundreds of times a year. Wood that can't expand, contract, and release moisture will eventually split along the grain.
The U.S. Forest Service Wood Handbook documents how moisture content drives nearly every dimensional change in wood, and exterior sauna wood sits directly in that path. Ventilation matters as much as any coating: trapped moisture causes more damage than rain ever will.
What You'll Need: Tools and Sauna-Safe Products
Gather the right supplies first, because the wrong cleaner or sealer causes more harm than skipping a season. Sauna wood is unfinished by design so it can breathe; products that seal the pores trap moisture and accelerate rot.
Your basic kit:
- Soft-bristle brush and a lint-free cloth
- Two buckets (one for cleaning solution, one for rinse water)
- Distilled white vinegar for routine disinfection
- Mild pH-neutral wood soap, never household detergent
- A sauna-safe wood treatment such as paraffin oil or sauna wax
- Fine-grit sandpaper (220-grit) for spot repairs
- Low-pressure garden hose or pump sprayer
One product worth keeping on hand is PROSAUNAS Sauna Wood Wax, a sauna-specific treatment for benches, backrests, walls, and trim. It repels moisture and dirt, enhances grain, and comes in black, white, grey, or clear to match cedar, aspen, hemlock, or spruce.

For exterior surfaces, skip wax entirely. Interior products are not formulated for siding or roofing, and using them outdoors wastes money and offers no UV protection.
Step 1: Clean Interior and Exterior Surfaces Safely
Start every session with a deep clean, because oil and wax cannot penetrate dirty wood. Work from the ceiling down so debris doesn't fall on finished surfaces.
Interior cleaning:
- Vacuum or brush away loose dust from benches, backrests, and walls.
- Mix a few tablespoons of distilled white vinegar into a quart of warm water.
- Wipe surfaces with a damp cloth, not a soaking one. Sauna wood should never be left visibly wet.
- Rinse with a clean damp cloth and dry immediately with a towel.
Exterior cleaning:
- Rinse the siding and trim with a low-pressure hose to lift surface dirt.
- Scrub stubborn spots with a soft brush and mild wood soap.
- Rinse thoroughly and let the wood dry completely, usually 24 to 48 hours in dry weather.
Vinegar handles everyday sanitation and leaves no chemical residue that heat will later release into the air. For heavier buildup, use a dedicated sauna wood cleaner, never anything abrasive.
The Best Wood Cleaner for Saunas: What to Look For
The best wood cleaner for saunas is pH-neutral and non-toxic, lifting dirt without stripping natural oils or leaving residue that off-gasses under heat. Avoid bleach, ammonia, and "restorers" with silicone or acrylic.
Check the label for a neutral pH, a biodegradable base, and a note that it's safe for interior wood surfaces. If ingredients aren't listed clearly, don't put it on a surface your skin will touch at 170°F.
Step 2: Pressure Washing vs. Manual Cleaning on Outdoor Sauna Wood
Manual cleaning wins for almost every outdoor sauna, with pressure washing reserved for weathered exterior siding only, at the lowest effective setting. Interior and exterior wood tolerate water differently.
Interior benches, backrests, and wall panels should never see a pressure washer; a damp cloth, soft brush, and vinegar solution handle them. Water forced into end grain and joints has nowhere to go, and in an enclosed hot room that moisture feeds mildew.
Exterior siding and trim can tolerate a low-pressure wash with a fan-tip nozzle held at least 12 inches away. Keep the stream moving, work with the grain, stop before the wood looks saturated, then rinse and dry fully before sealing.
A simple decision rule helps here:
| Surface | Best Method | Water Pressure | Frequency |
|---|---|---|---|
| Interior benches | Damp cloth and vinegar | None | Weekly |
| Interior walls and ceiling | Soft brush, mild soap | None | Monthly |
| Exterior trim | Soft brush and hose | Low | Seasonally |
| Exterior siding | Low-pressure wash | Under 1,200 PSI | Annually |
If you're unsure which camp a surface falls into, treat it as interior. Hand-cleaning something that could have been washed costs a little time; washing something that shouldn't be costs a repair bill.
Step 3: How Often to Oil Sauna Benches and Interior Wood
Oil sauna benches and interior wood every three to six months for a heavily used sauna, once or twice a year for occasional use. The wood tells you when: when water stops beading and the grain looks dry or chalky, it's time.
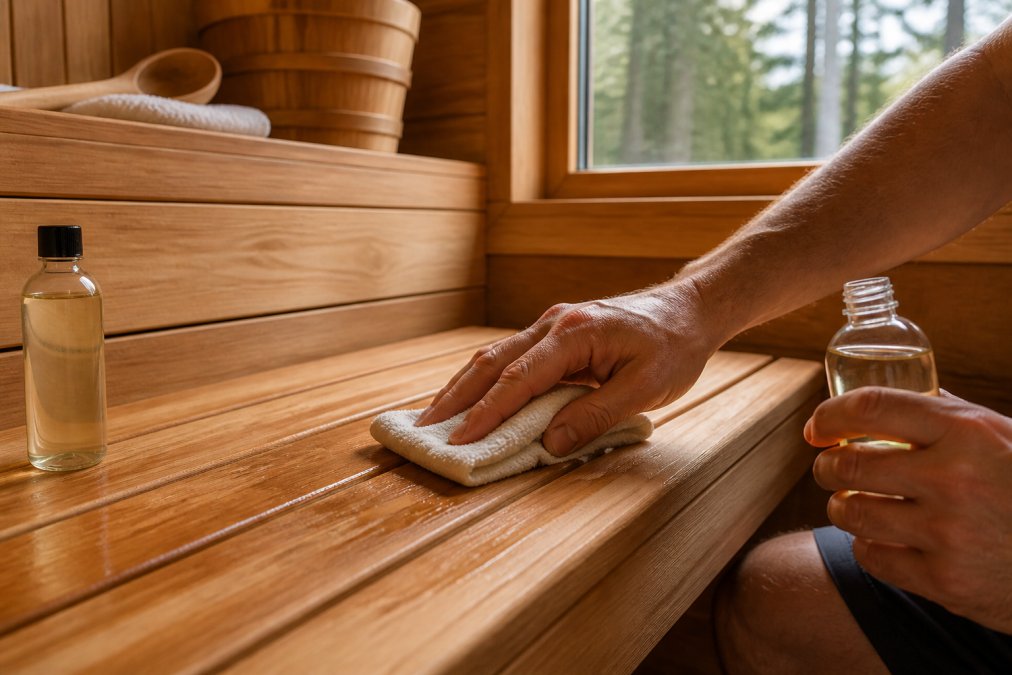
Clean and dry the wood completely, then apply a thin coat with a brush or lint-free cloth, working with the grain. Let it soak 10 to 15 minutes, then wipe off all excess; pooled oil creates a sticky film that collects dust and feels unpleasant against skin.
Two products cover most home saunas. SaunaLife Sauna Paraffin Oil is odorless, penetrates deeply, and forms a breathable water- and dirt-repellent barrier safe for direct skin contact on benches and headrests. Harvia Paraffin Oil offers similar protection in a colorless finish, covering up to ~53 sq ft per 500 ml bottle per coat.

Step 4: Seal and Protect Exterior Wood Surfaces
Exterior sauna wood needs a breathable, water-repellent finish with UV inhibitors, applied yearly in most climates and every six months in high-sun or coastal areas. This is the biggest difference between interior and exterior care: outside, you fight sunlight as much as water.
Choose a water-based sealant or exterior-grade oil rather than film-forming varnish or paint. Film finishes crack under thermal expansion, and once water gets behind them it can't escape; a penetrating finish moves with the wood.
Application sequence:
- Clean the surface and let it dry completely, at least 48 hours.
- Sand lightly if the grain feels rough, then wipe away dust.
- Apply the sealer with a brush, working in small sections with the grain.
- Back-brush any drips or pools within 15 minutes.
- Allow 24 to 48 hours to cure before the sauna's next use.
Reapply when water stops beading rather than waiting for visible graying. Once UV damage bleaches the surface, you're refinishing, not maintaining, a much bigger job.
Step 5: Preventing Mold in Outdoor Saunas
Preventing mold in outdoor saunas comes down to airflow, dryness between sessions, and catching leaks early. Mold needs sustained moisture, and an outdoor sauna offers more chances for it than an indoor unit. But prevention only goes so far, here's what to do once you see black spots, fuzzy growth, or soft wood.
Airflow and Dryness: The Prevention Layer
Run ventilation after every session: leave the door cracked and vents open at least 30 minutes so humid air escapes instead of condensing on cool wood. In humid climates, an exhaust fan or dehumidifier run for an hour after use makes a measurable difference.
Inspect for seepage quarterly: the roof line, window and door seals, and where the structure meets a foundation or deck. A small leak onto interior wood creates a permanent damp pocket no surface cleaning will fix.
A moisture meter takes the guesswork out of "is it dry yet." Readings above roughly 15 to 18 percent moisture content are too wet to oil, wax, or seal, finishing damp wood traps moisture under the film and feeds the problem. Wait for readings in the low teens or below.
Surface Mildew vs. Embedded Rot: Know Which You Have
Not every dark mark is the same problem, and the fix depends on which one you're looking at.
Surface mildew sits on top of the wood as a powdery or fuzzy film, often gray-green or black, and wipes away with light pressure. This is the easy case.
Staining fungi have penetrated the grain, leaving blue-black streaks or blotches while the surface stays hard under a screwdriver. This needs sanding, not just wiping.
Soft rot and decay mean lost structural integrity. If a screwdriver sinks in easily or the wood feels spongy, you're past cleaning and into replacement, no cleaner or oil reverses decay.
Remediation Steps for Black Spots and Mildew
For surface mildew on benches, backrests, or wall panels:
- Mix a diluted distilled white vinegar solution, roughly one part vinegar to three parts water.
- Scrub gently with a soft-bristle brush, working with the grain.
- Rinse with a clean damp cloth and dry immediately with a towel.
- Leave vents open and the door cracked for several hours afterward.
For staining that has soaked into the grain:
- Sand the affected area back to clean, light-colored wood using 120-grit, then finish with 220-grit.
- Vacuum or wipe away all dust.
- Re-oil the bare wood with a sauna-safe paraffin oil so the newly exposed grain is protected.
Where wood has gone soft, stop treating and plan replacement. Cut out the affected board, inspect the framing behind it for moisture damage, and fix the water source before installing new wood, replacing a board without fixing the leak just resets the clock.
High-Humidity Climates: Extra Steps That Matter
In coastal or consistently humid regions, the standard routine isn't enough. Add these:
- Run a small dehumidifier for an hour after each session, not just ventilation.
- Consider a breathable cover that allows airflow rather than a fully waterproof tarp, which traps moisture underneath.
- Check the underside of benches and the back side of wall panels, these are the spots that stay damp longest and get inspected least.
- Shorten the inspection interval from quarterly to monthly during the wettest season.
Treat early mildew with diluted distilled white vinegar, scrub gently, rinse, and dry thoroughly. For anything that has penetrated the grain, sand back to clean wood and re-oil.
Seasonal Maintenance Checklist and Wood Species Care
Most guides hand you one generic checklist. That ignores the two things that determine how long your sauna lasts: the season you're maintaining for and the species of wood you're maintaining. This section splits both out so you can build a routine that matches your sauna.
Wood Species: What Changes and What Doesn't
Every common sauna wood is unfinished by design and should never receive a film finish like varnish or paint. Beyond that, species differ in ways that change your cleaning pressure, oiling frequency, and weather resistance.
Cedar is the most rot- and insect-resistant common sauna wood, thanks to natural oils in the heartwood. It tolerates moisture and exterior exposure better than softer options. Clean it gently, aggressive scrubbing pulls out the softer earlywood between growth rings. Re-oil when water stops beading, typically every three to six months for heavy use.
Thermo-treated softwoods (thermally modified pine, ash, and similar) are heated in a controlled process that drives out moisture and changes the wood's chemistry, making them more dimensionally stable and rot-resistant than untreated versions. They still gray under UV and need a breathable exterior finish. Because the treatment darkens the wood, choose a clear or matching-tone oil, not a tinted product.
Aspen and spruce are softer and lighter, showing dirt, sweat stains, and mildew more readily than cedar. They need gentler cleaning, a soft cloth and mild soap, not a stiff brush, plus more frequent inspection for surface staining and more frequent light oiling, since the softer grain absorbs and releases moisture faster.
Alder sits between cedar and aspen in hardness and rot resistance.
| Species | Cleaning Pressure | Oiling Frequency | Exterior Durability |
|---|---|---|---|
| Cedar | Gentle | Every 3-6 months | High |
| Thermo-treated softwood | Gentle | Every 6 months | Moderate-High |
| Aspen | Very gentle | Every 3-4 months | Moderate |
| Spruce | Very gentle | Every 3-4 months | Moderate |
| Alder | Gentle | Every 4-6 months | Moderate |
| Hemlock | Gentle | Every 6 months | Lower |
Winterization: Getting the Sauna Through Cold and Wet
Cold weather is hard on exterior sauna wood because water soaked into the grain expands when it freezes, widening existing cracks and opening new ones. Fall and winter maintenance aims to get moisture out and keep it out.
Fall prep (before the first freeze):
- Inspect the exterior for any cracks, checks, or open joints and seal them before water can enter.
- Apply a fresh coat of breathable exterior sealer or exterior-grade oil while temperatures are still above the product's minimum application range, most water-based sealers need surface temperatures above roughly 50°F to cure properly.
- Clear gutters, roof lines, and any drainage paths so meltwater moves away from the structure.
- Verify door and window seals and replace any weatherstripping that has hardened or pulled loose.
- Check that vents can still be closed or shielded against driving rain and snow.
Winter routine:
- Keep snow from piling against the exterior walls and roof where it can melt into the wood.
- After each session, ventilate as usual, then close up once the interior is dry, don't leave the door open in freezing air with a warm interior, which drives condensation.
- Inspect monthly for ice dams, seepage, or new cracks that appear after freeze-thaw cycles.
Summer Prep: Heat, UV, and Humidity
Summer is when UV damage and humidity do their work. The goal here is UV protection and moisture management.
Spring-to-summer prep:
- Inspect for winter damage, lifted sealer, new cracks, discolored patches, and address each before the heat sets in.
- Sand and re-seal any exterior surface where the finish has worn thin or water no longer beads.
- Re-oil interior benches, focusing on high-contact areas: bench tops, front edges, and backrests.
- Check south- and west-facing surfaces specifically, since those take the most direct sun and gray first.
- Confirm ventilation still works, a stuck vent or blocked exhaust is a summer mold risk.
Summer routine:
- Wipe interior benches weekly with a damp cloth to remove sweat and body oils before they soak in.
- Inspect monthly for mildew, especially in humid climates, and treat early surface growth with a diluted vinegar solution.
- Re-check exterior sealer at mid-season in high-sun regions; coastal and high-altitude saunas often need a mid-year touch-up.
The Full-Year Baseline
If you want a single schedule to anchor everything above:
- Weekly: Wipe interior benches with a damp cloth; leave vents open after each session
- Monthly: Deep clean interior walls and ceiling with mild soap; inspect for mildew and new cracks
- Spring: Inspect exterior for winter damage; sand and re-seal siding and trim
- Summer: Re-oil interior benches; check UV exposure on south- and west-facing surfaces
- Fall: Clear gutters and roof lines; verify door and window seals before wet weather; apply fresh exterior sealer
- Annually: Full exterior inspection for seepage, rot, and loose fasteners
Common Mistakes That Damage Outdoor Sauna Wood
The most damaging mistakes come from trying to be thorough. Over-sealing, over-washing, and over-treating cause more harm than a relaxed maintenance schedule.
Frequently Asked Questions
What is the best oil to use on sauna wood?
Paraffin oil and sauna-specific wood wax are the two safest choices for outdoor sauna wood. Paraffin oil soaks into the grain, repels water and dirt, and stays safe for direct skin contact on benches and backrests. Sauna wax, such as PROSAUNAS Sauna Wood Wax ($22.85), adds a moisture-repellent finish that makes wiping down benches easier. Avoid linseed, tung, or furniture oils, since they can off-gas in high heat and leave a sticky film.
How often should I oil my sauna benches?
For a frequently used outdoor sauna, plan on oiling benches every 3 to 6 months. A sauna used once or twice a week can usually go 6 to 12 months between applications. Check by dripping a few drops of water on the bench: if it soaks in instead of beading, it is time to re-oil. High-contact areas like bench tops and backrests often need touching up sooner than walls or ceilings.
Can I use a pressure washer on outdoor sauna wood?
Use a low-pressure wash with a garden hose, a soft brush, and a sauna-safe cleaner instead. For stubborn grime, scrub by hand and rinse with clean water, then let the wood dry completely before applying oil or wax.
How do I prevent mold in an outdoor sauna?
Ventilation is the single most important step. Leave the door and vents open after each session so moisture escapes instead of settling into the wood. Wipe down benches and walls with a damp cloth, fix any leaks or seepage around the roof and door, and keep humidity in check. A diluted distilled white vinegar solution can disinfect surfaces between deep cleans. If mildew appears, treat it right away before it stains the grain.


Leave a comment